Trolls World Tour Movie Night Party
I’ll have to admit I wasn’t too gung ho about this movie night. I desperately wanted to put it off for another week because I wasn’t totally happy with the food selections I was coming up with. But then I would be letting the girls down. And that was more important than finding the “perfect” food choices. Because perfect doesn’t exist. So let’s just have some fun!
Trolls World Tour Movie Night Menu
This movie-night was hard because I already have movie night ideas for the first Trolls movie, which the girls did not want to do. They were adamant it had to be the World Tour movie. So I had to think a little harder to come up with food ideas for the second movie. I’m pretty pleased with our menu for the night!
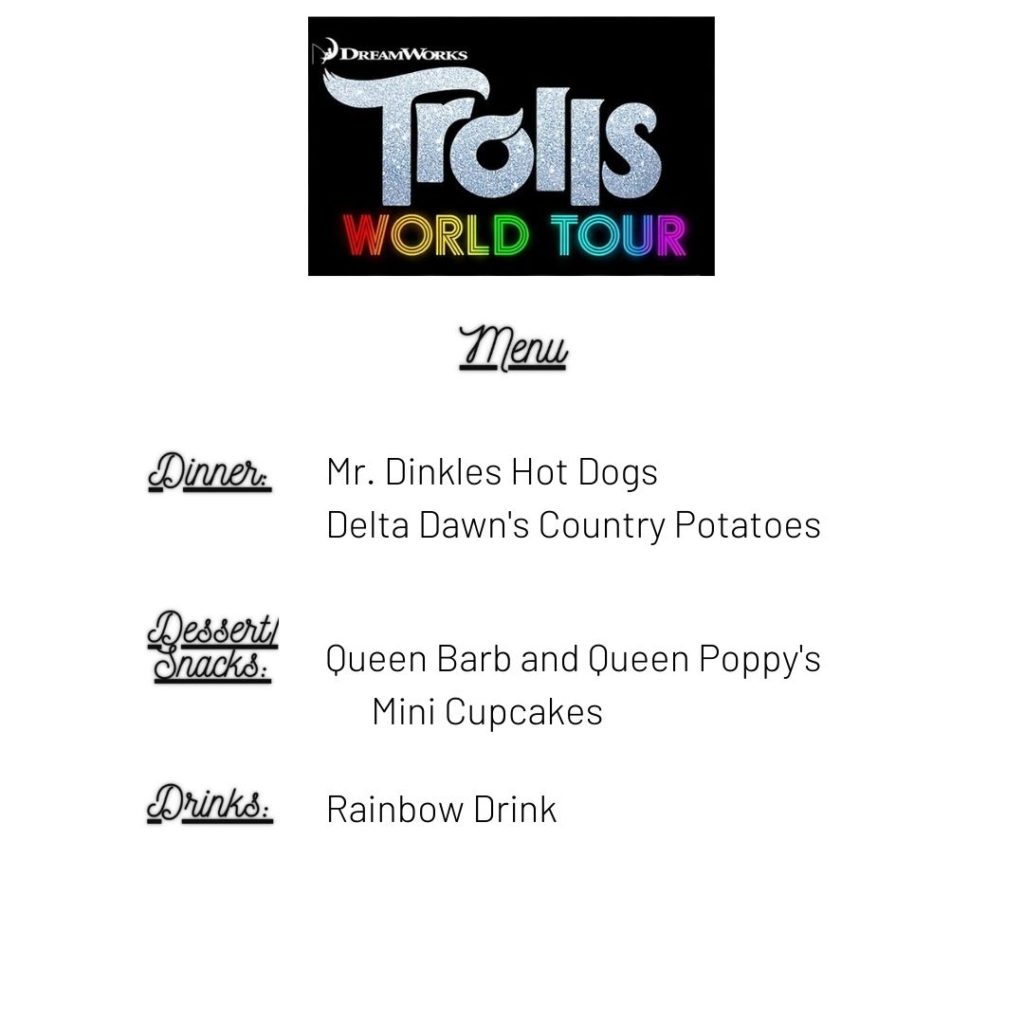
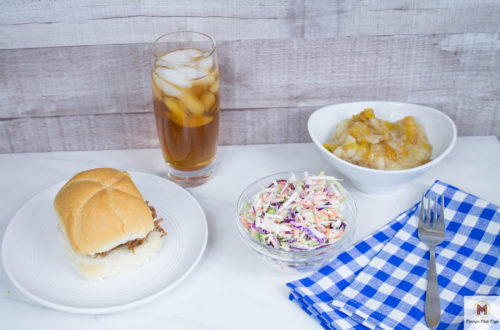
For our menu, I chose to do Mr. Dinkles Hotdogs, Delta Dawn’s Country Potatoes, Poppy and Queen Barb mini cupcakes, and a rainbow layered drink.
Mr. Dinkles Hotdogs for Trolls World Tour Movie Night
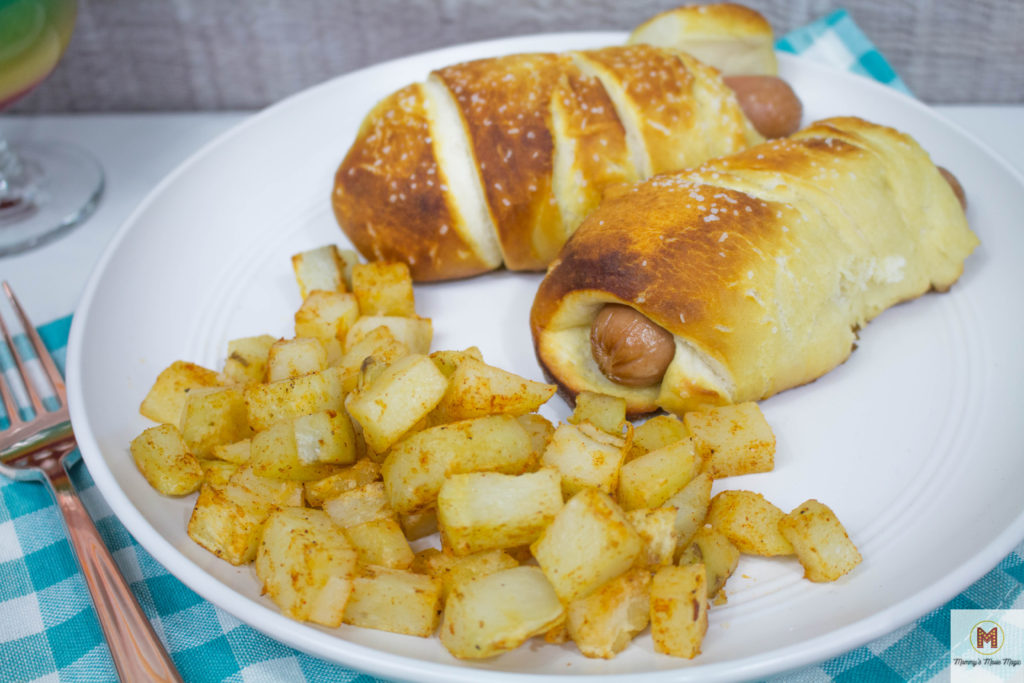
Looking for food to eat for tonight’s movie, I got my inspiration from Biggie’s best friend, Mr. Dinkles. He looks like a little hotdog so this was a good idea for our movie night!
The idea was to do a wrapped hotdog to look more like Mr. Dinkles. He has a striped shirt on so a wrapped hotdog would definitely look like Mr. Dinkles.
I found this recipe for homemade pretzel-wrapped hotdogs, and it came out perfect!
The original recipe is from The Food Charlatan and her recipes honestly came out to perfection! When I found this recipe I was looking for something more than wrapping my hotdogs in crescent rolls. I feel like I do that way too often because it’s easy so I wanted something I don’t get very often.
From start to finish, her recipe was well explained and I was able to follow the directions easily. It came out exactly the way it should and she didn’t leave out any details.
They were the perfect wrapped hotdogs for our Mr. Dinkles hotdogs.
Check out the original recipe here: The Food Charlatan Pretzel Wrapped Hotdogs.
Delta Dawn’s Country Potatoes
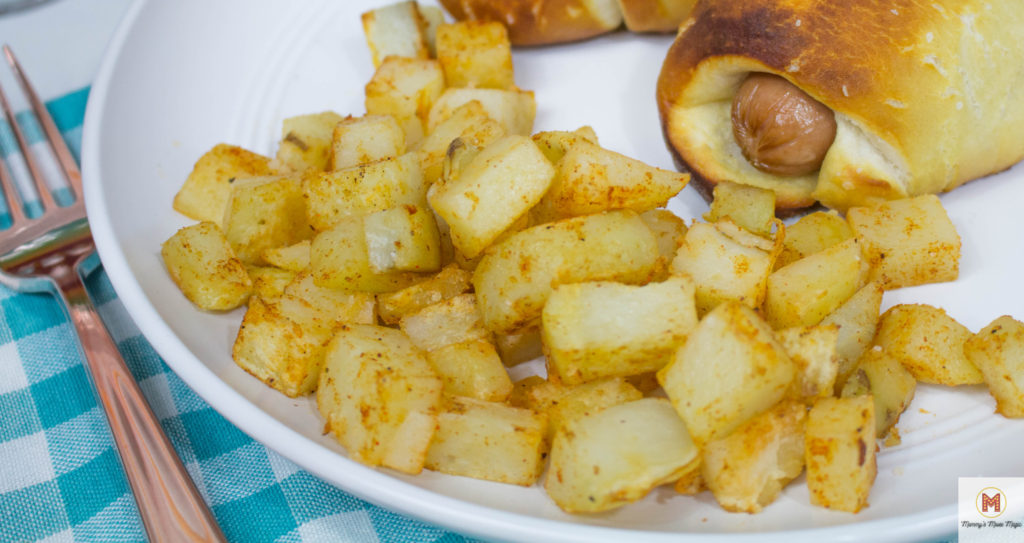
I had found the perfect dish for this movie night but had a little trouble looking for a side dish. My original thought was to try to include something for each of the 6 styles of music into different dishes. (Try to find good food for Funk and Techno…go ahead, I’ll wait. No? Me neither!)
Of the remaining styles of music, country seemed like a good option to make a tasty side dish my girls would eat. From my research, I found this easy simple country potato recipe that I just knew would do the trick.
I found this recipe from Spruce Eats and it was very simple to do.
Boil up some potatoes and fry them up in the skillet. Easy peasy. The girls liked it and kept referring to them as french fries. But we called them Delta Dawn’s Country potatoes.
You find the original recipe here: The Spruce Eats Country Potatoes
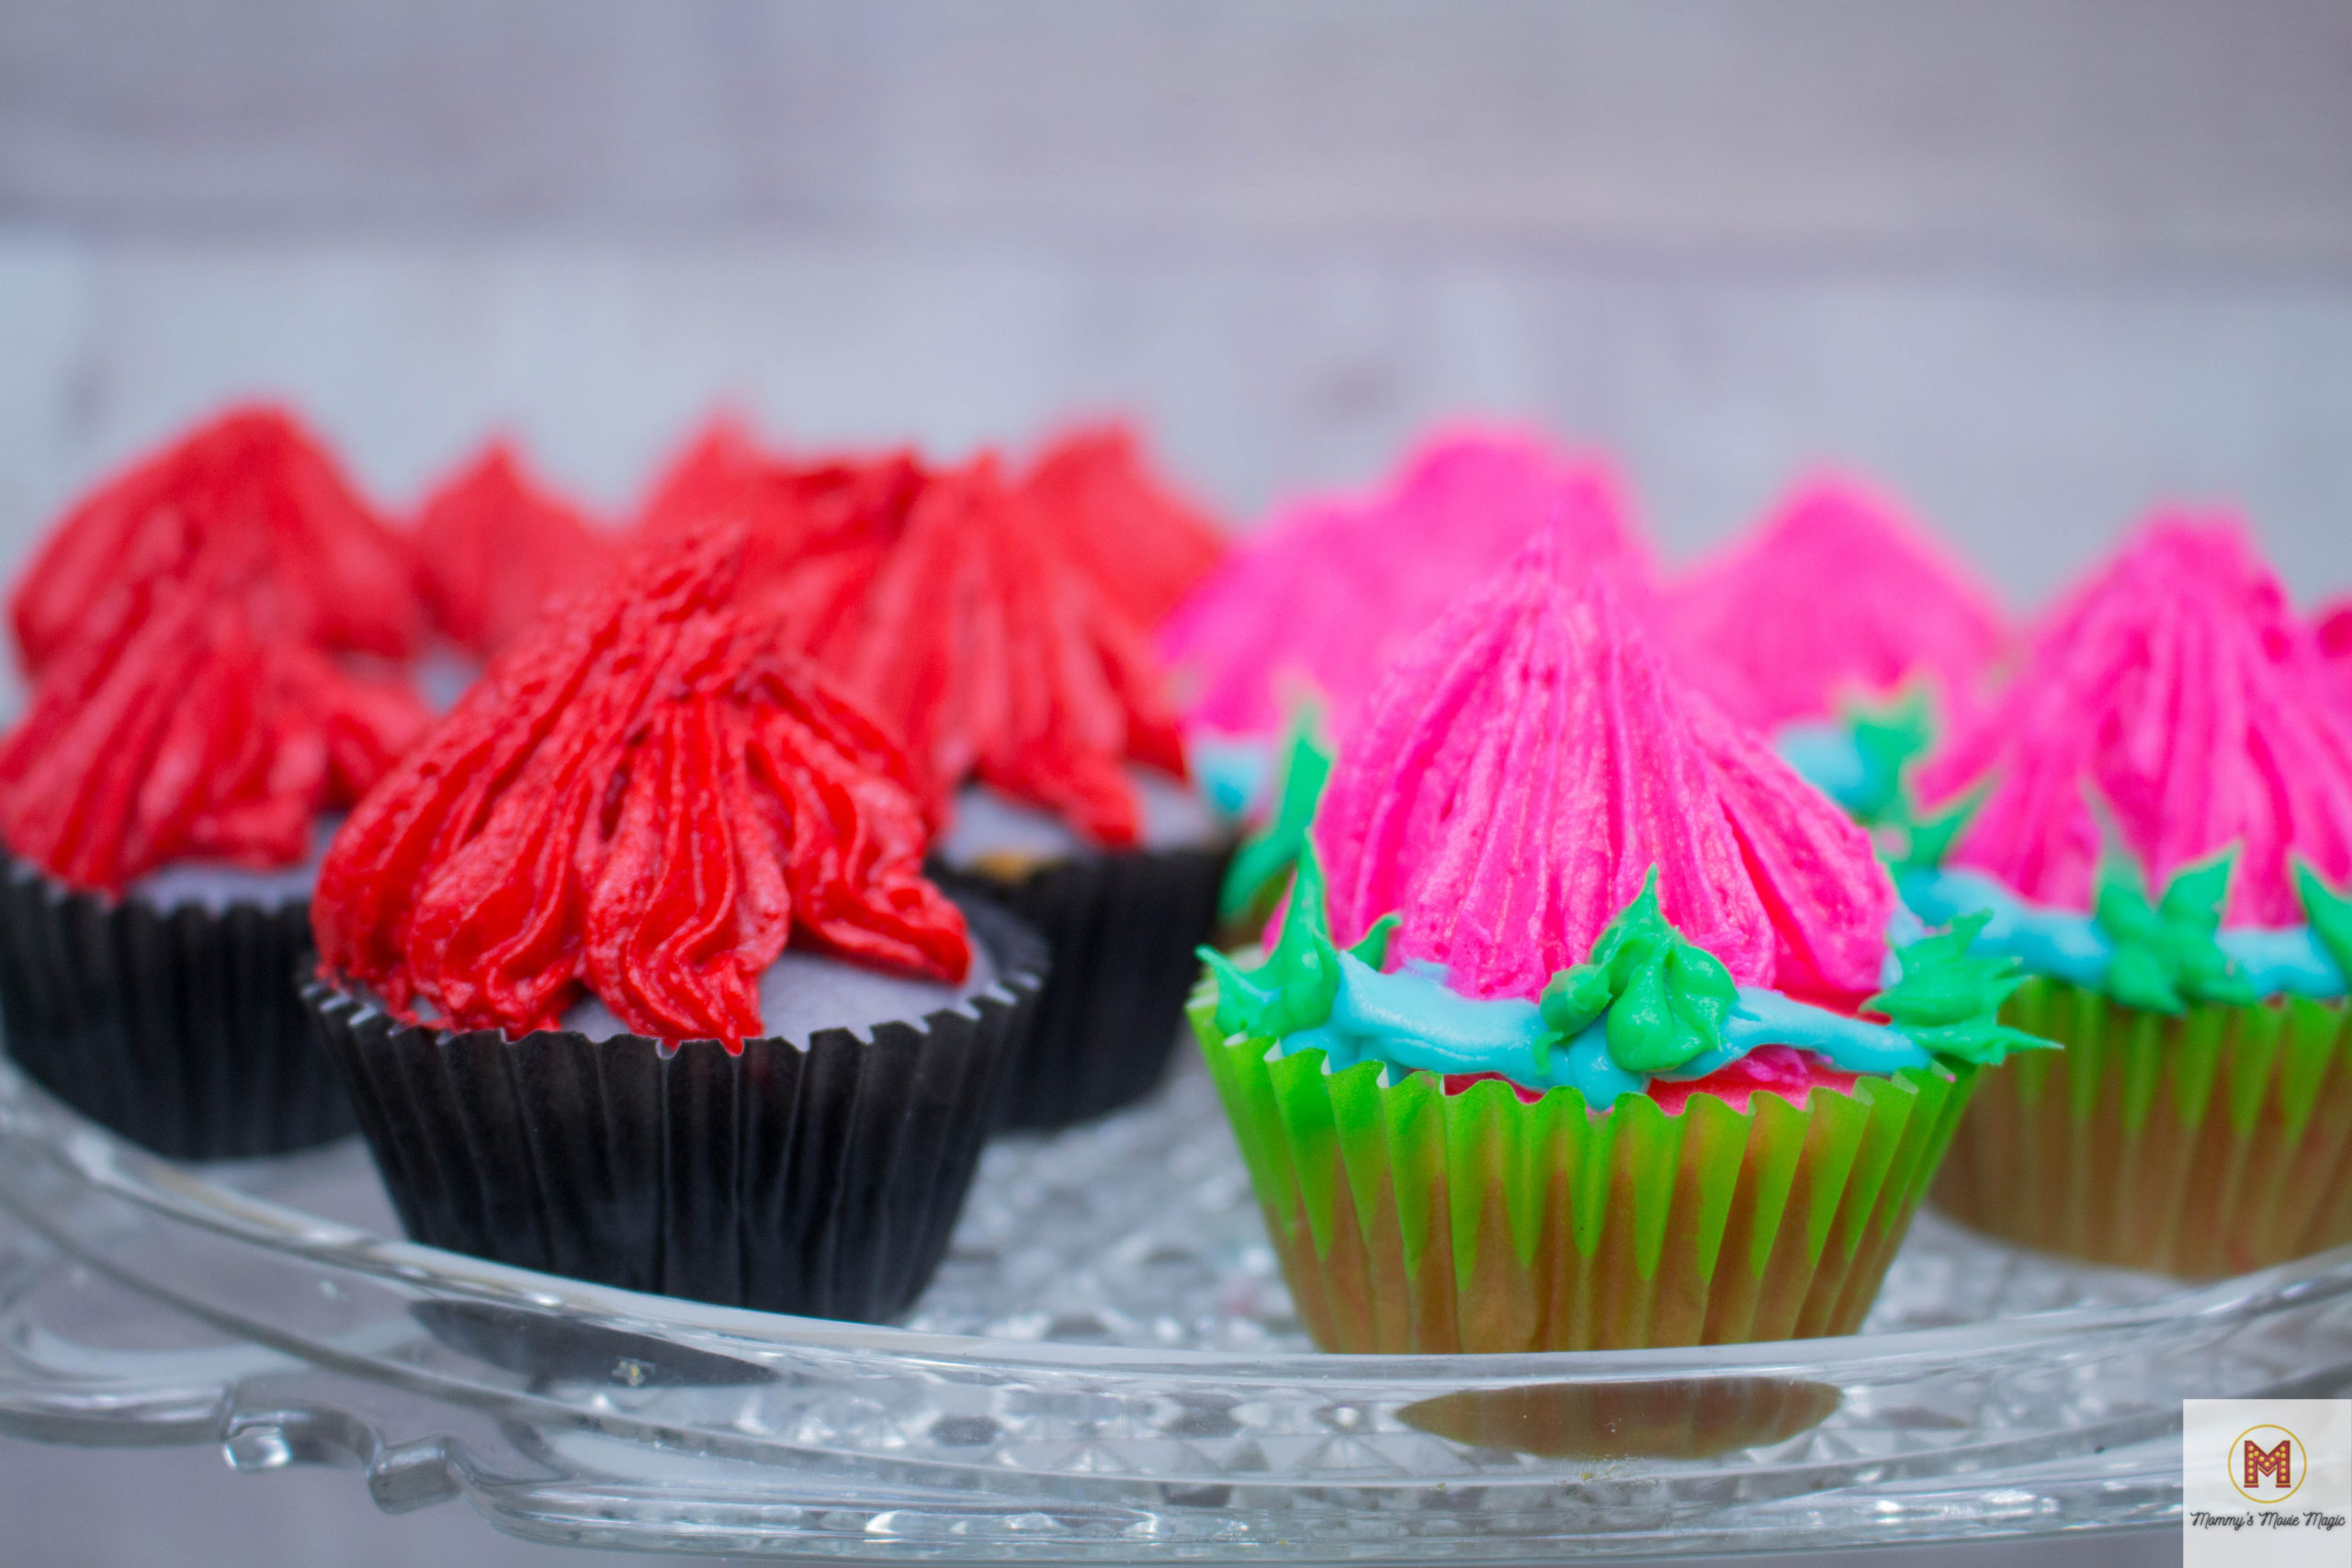
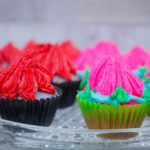
Queen Poppy and Queen Barb Mini Cupcakes

My oldest daughter’s favorites character from this movie is Queen Barb. She begged me to do something for Queen Barb. I wanted to do cupcakes but to be honest, we’re not big cake eaters in our family. (I know, something must be wrong with us! But it’s true.) So I decided to make mini cupcakes instead, so it’s not too much cake to eat.
Mini Queen Poppy and Queen Barb cupcakes were born!
If you have followed or read any of my other posts on my blog, I love making things homemade. But for the sake of ease and time, I used a box mix.
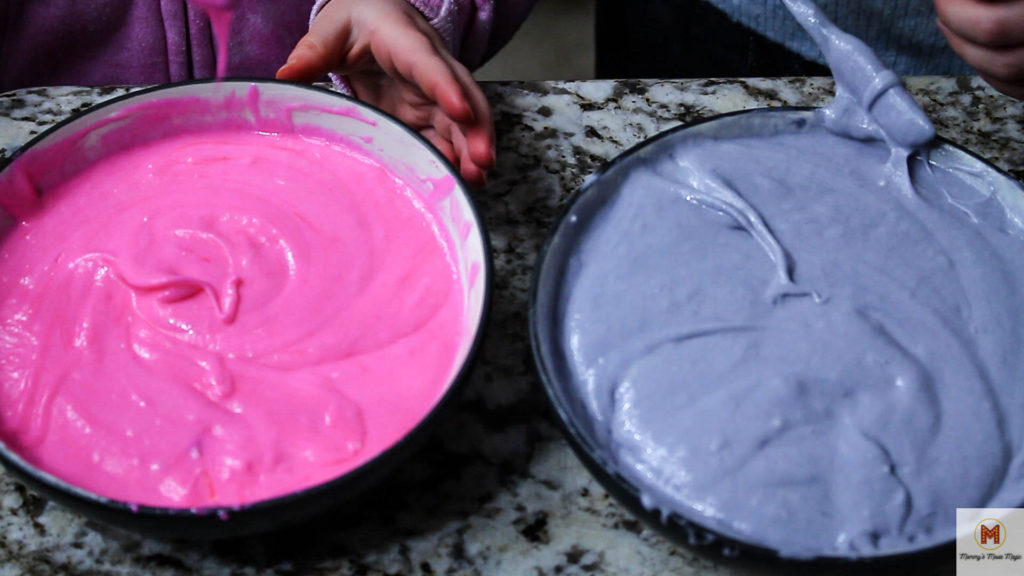
I made the box mix up and split it in two to dye to cake mix. I did one pink and the other I dyed grey. To get the grey color I just used black. A little bit of black dye helped me get the grey color I needed.
*Tip on Dying Cake Mix* Make sure your cake mix has the nice vibrant color you want. The color will only darken and fade once cooked. So just make sure it is the nice bright color you want it to be before baking.
Once the cake was dyed, we lined a mini cupcake pan with liners and filled them 2/3 of the way filled. Then we baked them for 12-15 minutes until bake.
Then when they came out of the oven, I let them cool on the counter for about 30 minutes before frosting them.
I made my frosting fresh because it’s super easy and tastes SO much better fresh in my opinion.
To make fresh buttercream frosting:
- Soften 1 stick of butter in a mixer for 1 to 2 minutes.
- Add in 2 cups of powdered sugar, 1/2 tsp vanilla, and 1 tablespoon of milk or whipping cream to a mixer and let it whip up for 3-5 minutes.
Sometimes, I prefer to spice up my frosting by adding some different flavors to it. I decided to add some strawberry flavoring to it. I boiled some strawberries down to get their syrup and added some of it to my buttercream frosting to make strawberry buttercream. I was dying it pink and red for the cupcakes so strawberry seemed like a good choice of flavor.
If you want to know how to make strawberry syrup, check this link here: Cooking Classy Strawberry Syrup
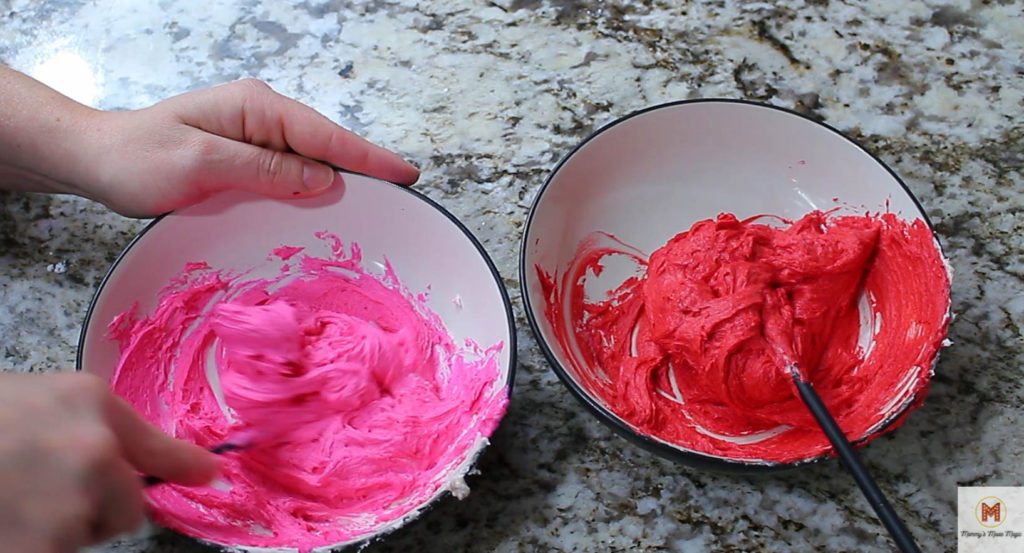
Next, I split up my frosting and dyed each of the pink and red.
*Pro-Tip for dying things red: You need ALOT of dye to color something red. Otherwise, it will just come out pink. I always keep a HUGE bottle of red in my baking supplies. After all, I seem to go through that color quicker because I need a lot more dye to get it to come out red than any other color. Red and Black are the 2 colors you need a lot of to make the color-rich.)
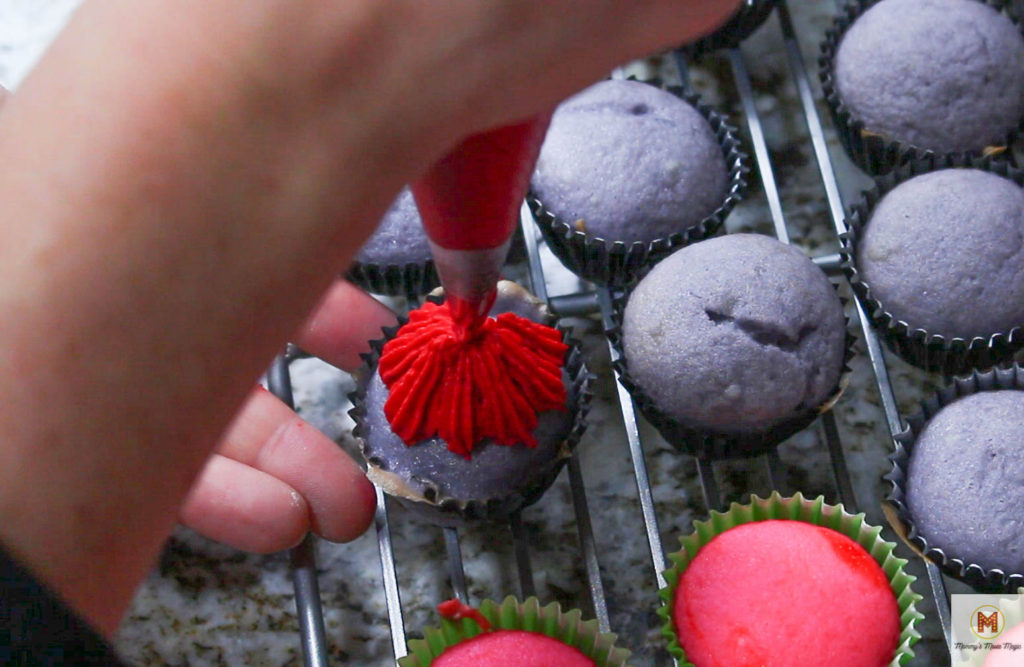
To get the Trolls hair to look the way it did, I used a 21 Wilton tip in a pastry bag. I piped out a middle pile, and they piped lines up to create the hairlines.
I also made a small separate batch and died it green and teal, where I piped a teal line for Poppy’s hair and green flowers in Poppy’s headband.
The girls were in the mood happy with these! Their love for Poppy and Barb run deep, so they were the happiest little ones with these cupcakes.
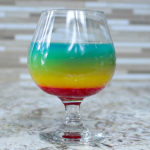
Rainbow Layered Drink
I wasn’t going to do another layered drink so soon, as I just did one for our Princess and the Frog Movie Night.
Check it out the whole movie night here: Princess and the Frog Movie Night
But when I couldn’t find what I was looking for on Pinterest, I decided to make my own!
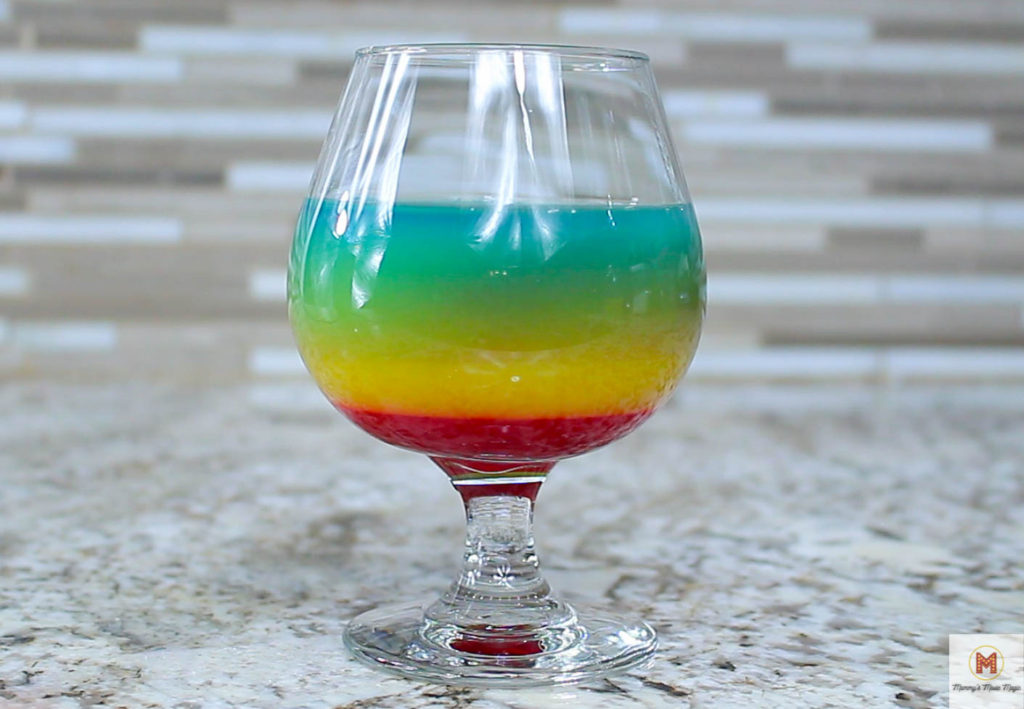
For a layered drink to work properly, the bottom layer needs to have the most sugar content. What I needed was a syrup that had a heavy sugar content. I couldn’t find what I needed so I made my own!
This recipe from Tastefully Frugal taught me how to make syrup for snow-cone making. And it was the PERFECT concentration of sugar, and only cost me $.25 for a pack of Kool-Aid.
Get the recipe here: Tastefully Frugal Snow Cone Syrup
What you need to create this rainbow drink:
- Orange Juice
- Any Red-colored Kool-Aid packet (strawberry or cherry) (to make the syrup)
- Club Soda
- Blue food coloring
Start by pouring your glass of orange juice about half full.
Use a spoon and pour your red syrup onto the spoon down the side of the glass, to slow down the syrup as it enters the drink, allowing it to sink to the bottom.
Next, you need to dye the club soda blue. It should be a bright blue color to make the colors stand out.
Then use a spoon to pour the club soda slowly down the side of the glass to slow down it entering the glass. It will sit on top of the orange juice, and mix a little in, creating a green layer, with a blue layer on top of it.
And finally, there you have your rainbow drink! It’s pretty isn’t it?!
Adult Friendly Option
If you are looking to step up this drink to something adult-friendly, just replace the club soda with vodka or another clear liquor.
Dye the liquor blue just like you would the club soda.
Due to the liquor being sugar-free it will also float on top!
Now you have a drink that is kid-friendly and adult-friendly!
Trolls World Tour Movie Night Crafts
Trolls World Tour: 6 Strings of Music Craft
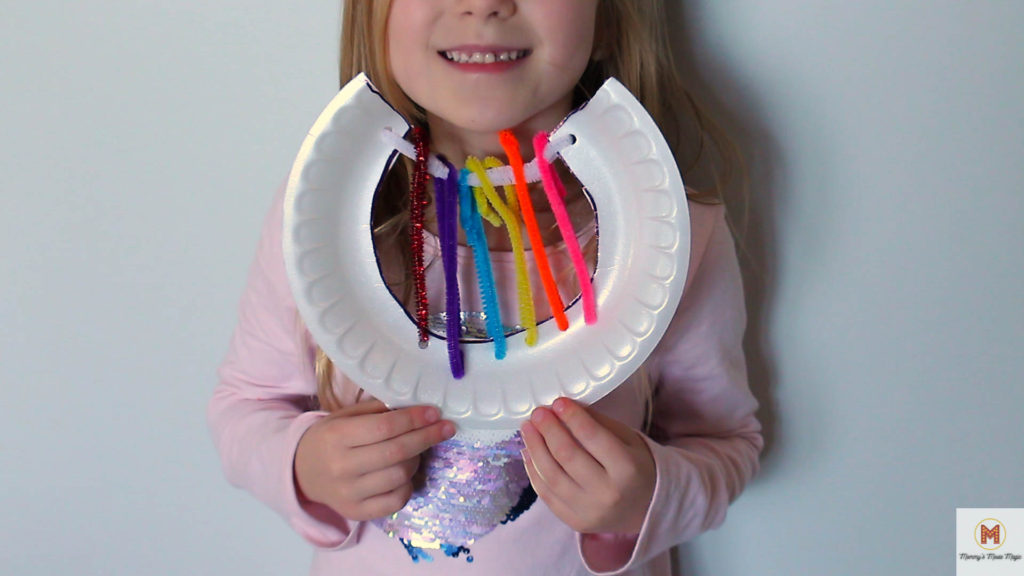
This craft we had fun making ourselves!
To make this craft you will need:
- 7 pipe cleaners (red, orange, yellow, green, blue, purple, and white)
- White paper plate
- Scissors
- Paper hole punch
- Marker
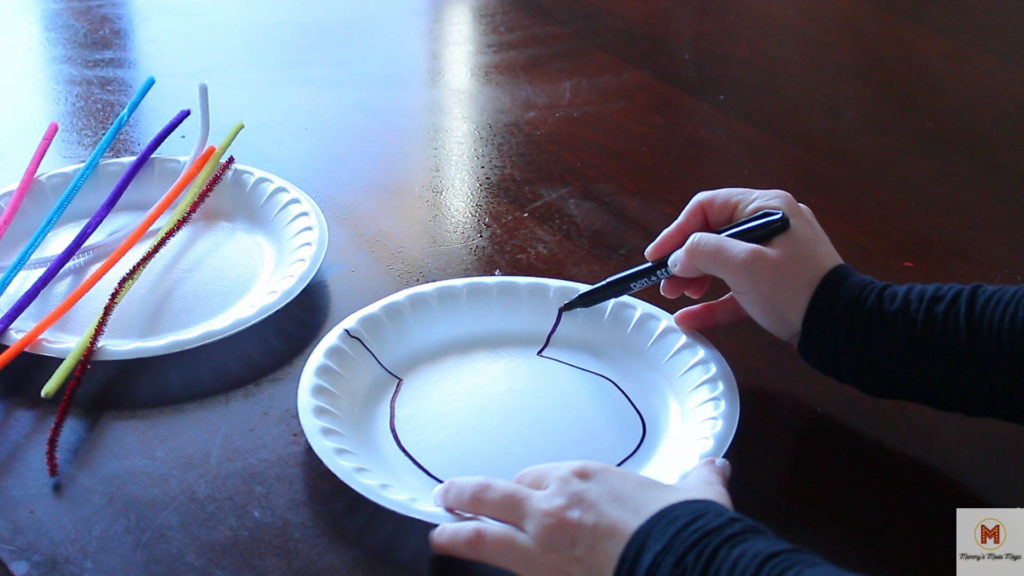
Start by marking on the plate the shape you want your harp to be. Then cut around the marks you drew.
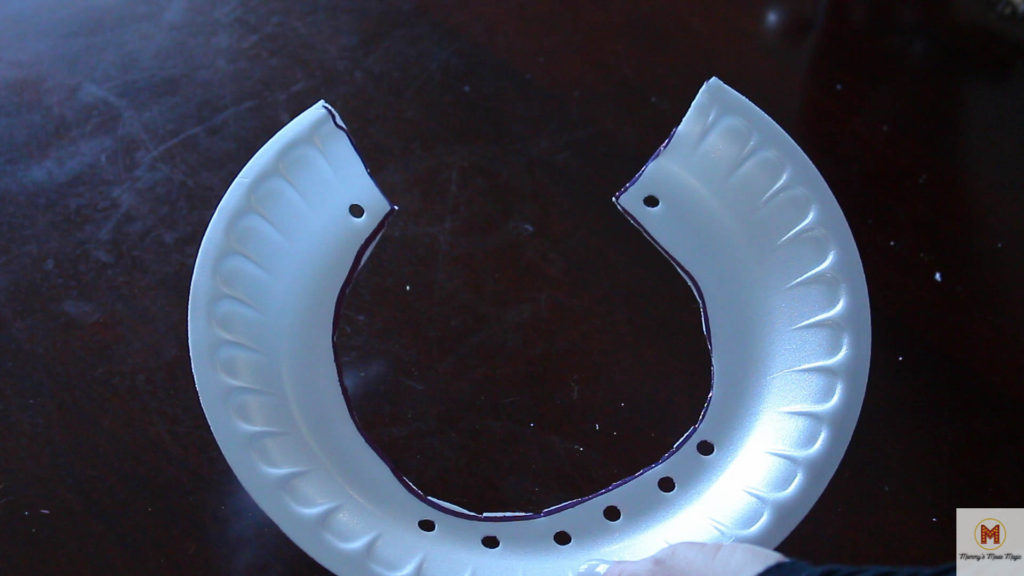
Next, you will want to use the hole punch to punch two holes at the top, and 6 holes and the bottom, like the picture above.
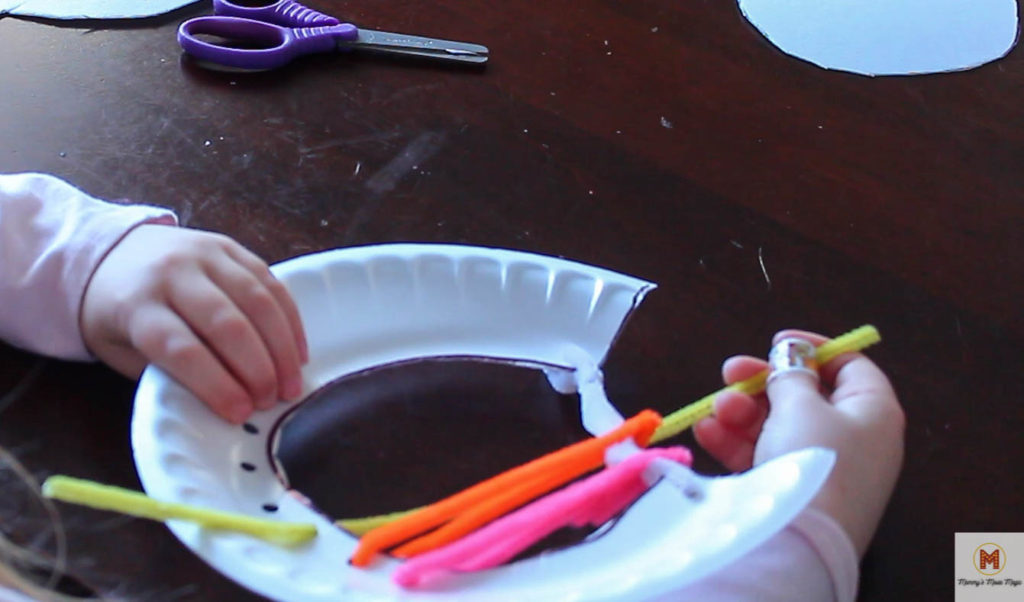
Finally, take each of your pipe cleaners, string them through a hole at the bottom, fold it in half, and connect and twist the pipe cleaner at the top over the white pipe cleaner.
Continue through the rest of the 6 holes until they are all done.
Have your kids even color their harp if you like!
I love easy crafts because I am not the most crafty person. So anything easy with things I already have at home at best for me!
Trolls World Tour Party Pack

DreamWorks has produced a Trolls World Tour Party Pack that has a TON of ideas in it! A few of our favorites, in particular, are the Tiny Diamond Glasses, and the Trolls World Tour Bracelets. But there are seriously quite a few cute things to do here!
Check out the original Party Pack here: DreamWorks Trolls World Tour Party Pack
Glitter Microphone Craft

I looked high and low for a microphone craft that didn’t require extra buying of things or finding the PERFECT item at the store just to make it.
This microphone was super easy to make and I have all the supplies here at home. Those kinds of crafts are the BEST.
You can find the original how-to here: Our Kid Crafts: Microphone Craft
Time for your own Trolls World Tour Movie Night!
Now is your time to make your own fun movie night.
If you have any questions about how to make your movie night more fun, reach out to me! I’m glad to help!
Let me know what you did below in the comments that made it more fun for your movie night?
Don’t forget to follow me on Pinterest to save all my recipes and craft ideas so you can find them easily in the future.
I can’t wait to see what you guys do for your movie nights!
Rainbow Drink
Ingredients
- 1 package Kool-Aid strawberry or cherry flavored
- 1 cup Sugar
- 1 bottle Orange juice
- 1 bottle club soda
- blue food coloring
Instructions
Red Syrup Recipe
- Boil 1 Cup sugar and 1 cup water for 3 minutes.
- Turn off heat and stir in the kool aid packet.
- Cool in the refridgerator until ready to use.
Blue Club Soda
- Take some blue food coloring on a toothpick and stir into some club soda.
Drink Building
- Start with orange juice in a glass and fill it up halfway.
- Use a spoon and place it on the side of the glass, and pour your syrup onto it, allowing the syrup to slowly drip down the side. It will sink to the bottom. Keep pouring until desired amount is in the bottom of the glass.
- Use the spoon and place it on the side fo the glass, and pour your blue club soda onto it, allowing it ot slowly drip down the side of the glass. It will float on top, part of it mixing with the orange juice creating a green and a blue layer.
- Enjoy!
Notes
Queen Barb and Queen Poppy Mini Cupcakes
Equipment
- Mini Cupcake tin
- Stand Mixer/Hand Mixer
Ingredients
- 1 box white cake mix
- 1 stick room temperature butter
- 2 cups powdered sugar
- red, black, pink, teal, and green food coloring
- mini cupcakes liners I used 2 colors, one for Barb, one for Poppy.
- 2 piping bags
- #21 Wilton piping tip
- 1/2 TBL Vanilla
- 1 TBL Whipping cream/Milk
Instructions
Mini Cupcakes
- Mix your cake mix together according to box instructions
- Seperate the cake mix into 2 bowls.
- Dye one bowl pink, and the other bowl grey (using a little bit of the black food coloring)
- Fill a mini cupcake baking tin with the mini liners.
- Fill the liners 2/3 full.
- Bake cupcakes for 12-15 minutes.
Frosting
- Whip up 1 stick of butter with a stand/hand mixer.
- Add in your 2 cups of powdered sugar. Mix on low until combined.
- Add in your 1 TBL of whipping cream or milk and your 1/2 TBL vanilla extract.
- Whip on high for 3-5 minutes until light and fluffy.
- Separate your icing into two seperate bowls. Dye one bowl pink and the other bowl red. (Tip: use alot of red to make sure your frosting turns out red and not pink.)
- Equip your piping bags with your #21 piping tip.
- Fill one piping bag with the pink icing, and one piping bag with red icing.
- Start icing your cupcakes. Place a small dallop of icing in the center of the cupcake.
- Start icing the cupcake and pull the piing tip towards the center and up, creating hair just like Poppy and Barb.
- Contunue doing this until the icing is all around the cupcake.
- Repeat this recipe until all your cupcakes are iced.
- Optional: If you want to make Poppys teal headband and green flowers, repeat the process for making the butter cream frosting. Split the frosting into 2 bowls and dye one teal and the other green. Fit your piping bag with a Wilton #3 tip for both colors, and pipe out the crown, and flowers.
- Enjoy these cute mini cupcakes.